Site Migrated

Site has been converted from Drupal to WordPress. Any download links that previously worked will probably be broken temporarily.

I will be restoring download links as I fix each page.

Though most of the posts/articles should be restored from the old site with images as of today, the formatting will be horrible until I can go through each one.

BASH Script: Check SSL certificate(s) for expiration

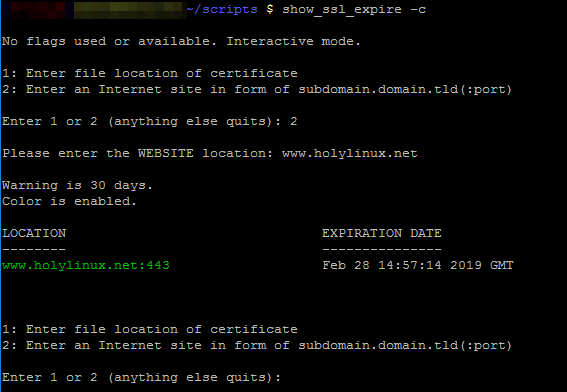
A Bash script to retrieve and check expiration date on given certificate(s).
This can be a file, website/internet site, or a list.

show_ssl_expire [-h] [-c] [-d DAYS] [-f FILENAME] | [-w WEBSITE] | [-s SITELIST]

Retrieve the expiration date(s) on SSL certificate(s) using OpenSSL.

Usage:
    -h  Help

    -c  Color output

    -d  Amount of days to show warnings (default is 30 days)
        Example: -d 15

    -f  SSL date from FILENAME
        Example: -f /home/user/example.pem

    -w  SSL date from SITE(:PORT) (Port defaults to 443)
        Example: -w www.example.com

    -s  SSL date(s) from SITELIST
        Example:      -s ./websites.txt
        List format:  sub.domain.tld:993 (one per line - port optional)

Example:
    $ show_ssl_expire -c -d 14 -s ./websites.txt

    WARNS (in color) if within 14 days of expiring on each entry in the file list.
  

Note: If no arguments/flags given the script defaults to interactive mode/loop.

Full script is located here: gist.github.com/bmatthewshea

Screenshot System – Share Screenshots Instantly Over AWS S3

This Guide

Over the years I have come to rely on sharing screenshots I take as I work. This guide will allow you to create a screenshot URL that is immediately usable based around a secure Amazon S3 storage bucket for a few dollars a month. I am using a Linux FTP server (LAN access only!) which accepts uploads from my Windows machines using a Windows application to take the screenshot, upload it, and then copy a usable URL to the copy/paste buffer. I can then share the web link with whoever/whatever.

Software/Servers

  • “PicPick” running on the MS Windows client machine(s). > https://picpick.app/en/download < This was chosen because: #1 It's free and #2 it has basic FTP and external command support.
  • A Linux FTP server. (Linux: vsftpd, proftpd – etc) I use vsftpd. Linux is needed as we will be mounting an S3 bucket using “fuse.s3fs”. I suppose this could be done under Windows but what’s the name of my site? 😉

Services

  • Amazon Web Services (AWS) Account
  • Minimum AWS services needed: CloudFront + S3 (CDN + STORAGE & WEB SERVICE)
  • AWS Optional but recommended: “Route53” for DNS. “Certificate Manager” for SSL (SSL is free – use it.)
  • A unique DNS “CNAME” addition to define your bucket within your domain for URL calls. This is very important if you wish the URL link to show as your domain and not an AWS S3 link.
  • If you want SSL on your S3 links, you will need a legitimate SSL certificate. You must use the free AWS “certificate manager” SSL (or import your current SSL into AWS Cert Store). Since you are using CloudFront you should have this option available for ‘free’.
  • I also use AWS Route53 (DNS) as well (USD $0.50 cents per domain as of Jan2018). This is optional, but if using AWS anyway, you may want to consider it.
  • (Optional) I also create an alarm under AWS billing. You can set it to notify you if your billing goes over a certain amount.

Disclaimer & Examples

All examples in this guide use the subdomain.domain.tld:

screenshots.mydomain.org

DISCLAIMER:
Screenshots using this system default to being world-readable on Amazon S3. That means anyone could potentially see them. If you upload something sensitive (like a password), you are being stupid.
Main point: Don’t blame me if you upload a screenshot of your bank password. Be careful when taking screenshots and double check them before sharing. You were warned!


1: AWS Setup

S3 bucket:

You MUST MATCH the “subdomain.domain.tld” used on both URL and bucket name.

Therefore if we use the example domain, the S3 bucket name created would be:
screenshots.mydomain.org

  • Once created, pick ‘properties’ tab. ENABLE “Static Web-hosting”
  • Use “index.html” as Index document.
  • Record/copy the ‘endpoint’ shown.
  • Add a blank ‘index.html’ file to this bucket.
  • (Optional) Setup the time to retain files (your screenshots). You can reduce your bill by having AWS move older stuff to “AWS Glacier”. Mine all move when they are 6 months or older.

Note: In this case “screenshots” will be CNAMED to your CloudFront endpoint under your providers DNS. (See below: DNS.)

Certificate Manager (recommended, but optional):

  • Select “Certificate Manager” under AWS console.
  • Create a new certificate that covers:
mydomain.org
*.mydomain.org

You could use “screenshots.mydomain.org”, but AWS *does* support wildcard certificates, so you should use one.

CloudFront:

  • Select CloudFront under AWS. Pick “Web” – “get started”
  • Origin Domain Name: Your S3 endpoint recorded above. (Using our example: “screenshots.mydomain.org.s3.amazonaws.com”.)
  • AWS should auto-populate this as a drop-down selection, but it doesn’t always show up right away.

  • Minimum TTL: 5mins
  • Price Class: Pick one. If you do not have your links clicked much – the price is negligible for best performance one (all edge locations).
  • Save. You should now see a Domain Name like “abc1abc1abc.cloudfront.net”. Record/Save this name for DNS entry later.
  • Now click Edit.
  • If you are using a Certificate Manager SSL certificate (above), you need to enter it now. (Pick “Custom SSL”, you should see your new certificate in drop-down box – pick it).
  • I also use: SNI, TLSv1.1 (recommeneded), HTTP/2, Logging off, IP6 left enabled

IAM:

  • Create the AWS IAM “identity” that will be used for mounting/writing to S3.
  • Load “IAM” on AWS console page. Create a new user with “AmazonS3FullAccess” Permission.
  • You will need to record the access key ID and the secret access KEY -> NOW!! These are used below as MYIDENTITY and MYCREDENTIAL, respectively. SAVE these in safe place/text file!!

2: DNS setup

Just log into your current DNS provider. I ended up moving my DNS provider from NameCheap (domain registrar) to AWS Route53.

  • Add a CNAME record that points to the given CloudFront Domain you created.

DNS Example:

CNAME entry: "screenshots"
VALUE/HOST: abc1abc1abc.cloudfront.net

3: FTP Server Setup and S3 Mount Point

  • Install Linux FTP server.
  • IMPORTANT: Create and record the FTP user name and password you are going to use. Mine is ‘screenshotuploads’ as username.
  • IMPORTANT: Set the FTP upload user default login location to the same area you are creating your S3 mount point.
  • In this example, the FTP login would drop the FTP upload user into “/mnt/s3/screenshots.mydomain.org/” – keep this in mind while setting up the FTP upload user.

  • Basic set up of FTP servers is beyond scope of this article. I use VSFTP.
  • Finally, create the mount point for S3FS (which is also the upload location for FTP upload user).

I am using /mnt/s3/screenshots.mydomain.org and Ubuntu/Debian package management (APT) in this example:

sudo apt install s3fs
sudo mkdir -p /mnt/s3/screenshots.mydomain.org

You should use your own “AccessID:SecretKEY” in place of MYIDENTITY:MYCREDENTIAL. You recorded this from the IAM section:

sudo echo MYIDENTITY:MYCREDENTIAL > /etc/.passwd-s3fs
sudo chmod 600  /etc/.passwd-s3fs
sudo s3fs screenshots.mydomain.org /mnt/s3/screenshots.mydomain.org -o passwd_file=/etc/.passwd-s3fs

4: Client / Screenshot App setup

  • Install PicPik app on the Windows client

PicPick Options: FTP

  • “FTP Server:” (The IP of your FTP server is fine here.)
  • “Port:” 21
  • “Remote Path:” (Leave blank if you used my ftp user configuration – it should default to S3 mount point on login – otherwise define S3 mount point here)
  • “Use Passive FTP” (Unchecked in my case – direct LAN ftp server – I do not need passive connections on the small FTP server)
  • “User Name:” (You should have this saved somewhere from the FTP setup)
  • “Password:” (You should have this saved somewhere from the FTP setup)
  • “Open URL in Web”: (Unchecked)
  • “Copy URL to Clipboard”: (Checked if you want to paste it immediately!!)
  • “URL”: Obviously, this is important as it needs to match your URL you are creating.
    In our case:

    https://screenshots.mydomain.org/

PicPick Options: File Name

  • I use “%w-%y-%m-%d_%h%n%s” – there is a table describing the tokens I used.

If you use the filename tokens above, the final URL will save as:

(https://) screenshots.mydomain.org/somehost-2018-07-31_120001.jpg

If you have the FTP server setup, go ahead and try a TEST under PicPick. If no error you are probably okay.

If that works, you can immediately paste the link somewhere. Try pasting to a web browser and test the URL. If everything is working it should load the screenshot quickly for everyone.

5: Final settings:

You need to permanently add the mount point (so it works across reboots). You must add it to “/etc/fstab”.

Example “/etc/fstab” entry:

screenshots.mydomain.org /mnt/s3/screenshots.mydomain.org fuse.s3fs _netdev,allow_other,passwd_file=/etc/.passwd-s3fs,default_acl=public-read 0 0

    FSTAB Options Used:

  • _netdev = only mount after network is up.
  • allow_other = create the mount point with proper read permissions for ‘all’/public.
  • passwd_file = Location of user or system password file to access S3 bucket.
  • default_acl = Permission setting for the AWS/S3 side. (Read-Only in this case)
  • uid | gid = (Not used in example) Mount the filesystem as a specific system user and/or group (meaning as non-root user – ROOT is default)
  • 0 0 = No dumps and no filesystem checks

Good luck. Feel free to contact me if you have any questions.

Certbot / Let’s Encrypt Wildcard Certificates – Ubuntu 17.xx


Wildcard is supported as of Certbot 0.22.2

Currently, version 0.22.2 is only available on the Ubuntu 17.xx repository. Other Linux distributions may differ of course. If you currently have Certbot installed under 17.xx you may wish to “certbot delete” and “apt purge” it first. In other words you should probably start over.

Install Certbot:

[prism:bash]sudo apt-get update
sudo apt-get install software-properties-common
sudo add-apt-repository ppa:certbot/certbot
sudo apt-get update
sudo apt-get install certbot
[/prism:bash]

Certbot should now be at version 0.22.2 or greater:

[prism:bash]$ certbot –version
certbot 0.22.2[/prism:bash]

Edit this file to use new/proper version of LetsEncrypt (ACME v02):

[prism:bash]sudo nano /etc/letsencrypt/cli.ini
[/prism:bash]

Add this line at end:

[prism:bash]server = https://acme-v02.api.letsencrypt.org/directory[/prism:bash]

Update this line to your domain and execute:

[prism:bash]sudo certbot –agree-tos –manual –preferred-challenges dns certonly -d *.domain.tld[/prism:bash]

At this point, just follow the prompts.
When it prompts for you to add a DNS TXT record, you will need to do that. As far as I know, other validation/plugins do not support newest LE (yet).

Use the FIND command to reduce old backup/files


A Bash script to remove/cleanup backups (or any files matching the date field in filename).

Uses FIND command – Example shown retains/saves 1st of month backup only if older than 90 days.

Create a shell script:

[prism:bash]$ sudo nano /opt/scripts/cron_prune_backups.sh[/prism:bash]

Edit for days desired (change +90 to your choice, and/or day of month ’01’, and/or filename) and save:

[prism:bash]#!/bin/bash

DS=`date “+%Y-%m-%d %H:%M:%S”`
FINDPATH=/opt/mysql-backups
LOG=”$FINDPATH”/mysql-backup-removal.log

### find >= 90 day – but leave/exclude a 1st day of month forever…
find “$FINDPATH”/backupname_* -name ‘backupname_??-01-*’ -prune -o -mtime +90 -exec ls {} \; >> “$LOG”[/prism:bash]

Set some permissions:

[prism:bash]$ sudo chown root:root /opt/scripts/cron_prune_backups.sh
$ sudo chmod 744 /opt/scripts/cron_prune_backups.sh[/prism:bash]

Test run:

[prism:bash]$ cd /opt/scripts/ && sudo ./cron_prune_backups.sh[/prism:bash]

Running the above should produce a `ls` file list in your defined log.

The test above only lists files.
If the correct files are listed for deletion, just replace the find line with this (added ‘rm’):

[prism:bash]find “$FINDPATH”/backupname_* -name ‘backupname_??-01-*’ -prune -o -mtime +90 -exec ls {} \; -exec rm {} \; >> “$LOG”[/prism:bash]

Add to root crontab and you are done:

[prism:bash]$ sudo crontab -e[/prism:bash]

Adjust to your liking and save:

[prism:bash]## run on 2nd of month/each month:
0 0 2 * * /opt/scripts/cron_prune_backups.sh[/prism:bash]

Fail2ban – Postfixadmin Authentication Jail


Quick fix to “Postfixadmin” and a jail for “Fail2ban” to allow fail2ban use.

NOTE:
You should really keep “Postfixadmin” web admin behind a firewall/localnet only. You’ve been warned..

Edit postfixadmin/login.php (starting @ line 63 or so under Postfix Admin v2.3.8) :

Substitute your location (if an Ubuntu pkg its normally under /usr/share):

[prism:bash]sudo nano /var/www/html/postfixadmin/login.php[/prism:bash]

Add the following lines ONLY and save:

[prism:php] if ($result[‘rows’] != 1)
{
$error = 1;
$tMessage = ” . $PALANG[‘pLogin_failed’] . ”;
//Add this line
error_log(‘BAD LOGIN ATTEMPT, username “‘ . $fUsername . ‘”, password “‘ . $fPassword . ‘”‘);
}
}
else
{
$error = 1;
$tMessage = ” . $PALANG[‘pLogin_failed’] . ”;
//Add same line
error_log(‘BAD LOGIN ATTEMPT, username “‘ . $fUsername . ‘”, password “‘ . $fPassword . ‘”‘);
}[/prism:php]

So, two lines added to admin login. Now we need to add that same line once to the users area.

Edit postfixadmin/users/login.php (shows start at line 63 or so):

[prism:php] else {
$error = 1;
$tMessage = ” . $PALANG[‘pLogin_failed’] . ”;
//Add same line
error_log(‘BAD LOGIN ATTEMPT, username “‘ . $fUsername . ‘”, password “‘ . $fPassword . ‘”‘);
$tUsername = $fUsername;
}

include (“../templates/header.php”);[/prism:php]

A bad auth simply gets logged to /var/log/apache2/error.log now using php error_log method..

Now FAIL2BAN :

Create a new filter for fail2ban by creating /etc/fail2ban/filter.d/postfixadmin.conf

Add these lines and save:

[prism:apache][postfixadmin]

enabled = true
port = http,https
filter = postfixadmin
logpath = /var/log/apache2/error.log
findtime = 60
maxretry = 3
bantime = 120[/prism:apache]

Restart fail2ban:

[prism:bash]sudo service fail2ban restart[/prism:bash]

Your /var/log/apache2/error.log should now start showing things like this (as fail2ban monitors it):
[prism:apache][Fri May 27 12:24:23.858680 2016] [:error] [pid 12927] [client 10.72.244.233:11460] BAD LOGIN ATTEMPT, username “sdsd@dfdf.com”, password “ss”, referer: https://mail.somewhere.tld/postfixadmin/login.php[/prism:apache]

Hope this helps someone. Works fine – tested over some weeks now.

Ubuntu 14.xx/Trusty – Postgrey – startup/init.d

Ubuntu (past/present) has a broken Postgrey SysV /etc/init.d (start(up)/status/stop) file – and possibly will not startup (default install) on a reboot/etc. This will have an ill effect on mail delivery (postfix/etc).

Here is one that works. Make sure you either replace entire file with one below or edit the pertinent lines.

Remember that this is not an upstart override – you are editing a SysV init file directly.

Update / Install:

sudo apt-get update && sudo apt-get install postgrey

Edit init.d file:

sudo nano /etc/init.d/postgrey # (file is next – changes are noted)
#! /bin/sh
#
# postgrey      start/stop the postgrey greylisting deamon for postfix
#               (priority should be smaller than that of postfix)
#
# Author:       (c)2004-2006 Adrian von Bidder 
#               Based on Debian sarge's 'skeleton' example
#               Distribute and/or modify at will.
#
# Version:      $Id: postgrey.init 1436 2006-12-07 07:15:03Z avbidder $
#
### BEGIN INIT INFO
# Provides:          postgrey
# Required-Start:    $syslog $local_fs $remote_fs
# Required-Stop:     $syslog $local_fs $remote_fs
# Default-Start:     2 3 4 5
# Default-Stop:      0 1 6
# Short-Description: Start/stop the postgrey daemon
### END INIT INFO

set -e

PATH=/sbin:/bin:/usr/sbin:/usr/bin
DAEMON=/usr/sbin/postgrey
NAME=postgrey
DESC="postfix greylisting daemon"
SCRIPTNAME=/etc/init.d/$NAME

# CHANGE – bad stop start based off /proc/PID/stat
# (is now truncated 15 char path) (Ubuntu 12.xx +) – in this case = ‘/usr/sbin/postg’
# added PROCNAME and PIDFOLDER :

PROCNAME=`echo $DAEMON | cut -c -15`
PIDFOLDER=/var/run/$NAME
#PIDFILE=/var/run/$NAME.pid
PIDFILE=$PIDFOLDER/$NAME.pid

# end CHANGE

# Gracefully exit if the package has been removed.
test -x $DAEMON || exit 0

. /lib/lsb/init-functions

# Read config file if it is present.
if [ -r /etc/default/$NAME ]
then
    . /etc/default/$NAME
fi

# CHANGE – Create new PID folder in /run if not exist

    if [ ! -d $PIDFOLDER ]; then
        mkdir $PIDFOLDER
        chmod 0755 $PIDFOLDER
    fi

# end CHANGE

POSTGREY_OPTS="--pidfile=$PIDFILE --daemonize $POSTGREY_OPTS"
if [ -z "$POSTGREY_TEXT" ]; then
    POSTGREY_TEXT_OPT=""
else
    POSTGREY_TEXT_OPT="--greylist-text=$POSTGREY_TEXT"
fi

ret=0
case "$1" in
  start)
        log_daemon_msg "Starting $DESC" "$NAME"
        if start-stop-daemon --start --oknodo --quiet \
                --pidfile $PIDFILE --name $NAME \
                --startas $DAEMON -- $POSTGREY_OPTS "$POSTGREY_TEXT_OPT"
        then
            log_end_msg 0
        else
            ret=$?
            log_end_msg 1
        fi
        ;;
  stop)
        log_daemon_msg "Stopping $DESC" "$NAME"
        if start-stop-daemon --stop --oknodo --quiet \

# CHANGE
# –pidfile $PIDFILE –name $NAME
–pidfile $PIDFILE –name $PROCNAME
# end CHANGE

        then
            log_end_msg 0
        else
            ret=$?
            log_end_msg 1
        fi
        rm -f $PIDFILE
        ;;
  reload|force-reload)
        log_action_begin_msg "Reloading $DESC configuration..."
        if start-stop-daemon --stop --signal 1 --quiet \

# CHANGE
# –pidfile $PIDFILE –name $NAME
–pidfile $PIDFILE –name $PROCNAME

# end CHANGE
        then
            log_action_end_msg 0
        else
            ret=$?
            log_action_end_msg 1
        fi
        ;;
  restart)
        $0 stop
        $0 start
        ret=$?
        ;;
  status)
        status_of_proc -p $PIDFILE $DAEMON "$NAME" 2>/dev/null
        ret=$?
        ;;

  *)
        echo "Usage: $SCRIPTNAME {start|stop|restart|reload|force-reload|status}" >&2
        exit 1
        ;;
esac

exit $ret

Update init.d and start service:

sudo update-rc.d postgrey defaults && sudo service postgrey start

Start, Stop, Status and Restart should all work now.

Reference:

  1. https://help.ubuntu.com/community/PostfixGreylisting
  2. https://bugs.launchpad.net/ubuntu/+source/postgrey/+bug/1289424
  3. https://bugs.launchpad.net/ubuntu/+source/postgrey/+bug/981789

Raspberry Pi + Webcam + Zoneminder

0. Parts & Software

Approximate Total Price: ~$50

Notes and Quirks with webcams:

  • This webcam does not need a self-powered USB hub. Some models do.
  • This model is not found using "zmu -d /dev/video0 -vqV2" (etc) – it does not enumerate. I used v2l utils to identify capabilities.
  • Please consider running Zoneminder on a desktop/server type machine and use the Pi as a capture only device. This article is just to show it can be done / ‘proof of concept’.

1. Install

Installing Zoneminder should also install (among others) php/mysql/ffmpeg and apache2 – I like to do Apache separately.

  sudo apt-get update && sudo apt-get upgrade
  sudo apt-get install apache2
  sudo apt-get install zoneminder
  sudo apt-get install v4l-utils

Unfortunately the package for Zoneminder needs some work. Please follow this carefully!


2. Configure Apache/Web and Permissions

# Allow www-data to access webcam:
  sudo usermod -aG video www-data
# Add CGI ScriptAlias if not present after installing:
  sudo nano /etc/zm/apache.conf
Alias /zm /usr/share/zoneminder
ScriptAlias /cgi-bin /usr/share/zoneminder/cgi-bin
<Directory /usr/share/zoneminder>
  php_flag register_globals off
  Options Indexes FollowSymLinks
    <IfModule mod_dir.c>
      DirectoryIndex index.php
    </IfModule>
</Directory>

# Correct ownership/give write+read+execute dir access to www-data group under /var/cache/zoneminder/*
  sudo chown -R root:www-data /var/cache/zoneminder/*
  sudo find /var/cache/zoneminder/ -type d -exec chmod 775 {} +
# Correct Perl memory bug in zoneminder code if present:
# REF : http://www.freshports.org/multimedia/zoneminder/files/extra-patch-scripts_ZoneMinder_lib_ZoneMinder_Memory.pm.in
  sudo nano /usr/share/perl5/ZoneMinder/Memory.pm
  # line 130 - Change from:
-our $arch = int(3.2*length(~0));
  # To:
+our $arch = 32;

# SymLink Apache file to conf.d:
  sudo ln -s /etc/zm/apache.conf /etc/apache2/conf.d/zoneminder.conf
# Install Cambozola Java Plugin
  mkdir ~/tmp && cd ~/tmp
  wget http://www.andywilcock.com/code/cambozola/cambozola-latest.tar.gz
  tar xvf cambozola-latest.tar.gz
  sudo cp ./cambozola-*/dist/cambozola.jar /usr/share/zoneminder
  cd ~ && rm -rf ~/tmp  


3. Find your webcam formats for zoneminder

# Find formats of webcam for zoneminder config:
  zmu -d /dev/video0 -vqV2
# If that does not work or fails to enumerate, try:
  v4l2-ctl --list-formats


4. Kernel shared memory settings:

# Set shared memory for 512MB RPi board:
# 128MB shhmax shared:
  sudo su -
  echo "kernel.shmmax = 134217728" >> /etc/sysctl.conf
  exit
# 2MB shmall pages:
  sudo su -
  echo "kernel.shmall = 2097152" >> /etc/sysctl.conf
  exit


5. ZM Setup and Testing
 

REBOOT RPi & open a web browser pointing to local RPi IP

From Pi desktop:
http://localhost/zm
or
http://LAN.IP.FOR.RPI/zm
if on separate pc on local network (Recommended)

Note: Remeber that running a desktop manager under the RPi will use more memory and resources – not advised.

Setup a bandwidth profile:

  • Click Options on far right. Click "High B/W".
  • Change "WEB_H_REFRESH_IMAGE" to "5" (seconds).
  • Make sure "jpeg" is set as method for stream.
  • SAVE.
  • On main console page pick "Low" Bandwidth link and change to "High" Bandwidth.

Misc Options to check or set (Optional)

  • Click Options on far Right and Pick "Images"
  • Look for OPT_CAMBOZOLA and check it.
  • Look for PATH_CAMBOZOLA and you should see or set to: "cambozola.jar" (only)
  • Look for PATH_FFMPEG and set to: "/usr/bin/ffmpeg"
  • Note: For Cambozola to work, you may need to set an exception on it's Java jar. (Self-Signed as of this writing)
  • SAVE.

Video

-> Select "/dev/video0 (0)" Link (or your default device)

  GENERAL TAB:
  • Source: Local
  • Function: Monitor (later you can change this if everything works to MoDetect)
  • Set frame rate at 5. Set 10 as max.
  SOURCE TAB:

(Setup web/security camera using settings found above in STEP 3).
(Many cheaper webcams use NTSC or PAL + YUYV or MPEG1 compression)

  • Channel = 0
  • 320×240 -> (Set capture width @ 320 or less. Set capture height @ 240 or less.)
  • SAVE.

Test the Web Streaming

  • Click 'Monitor-1" (default monitor) from main console page.
  • You should see: a stream if using Cambozola, or a new JPG every 5 secs if not using it.
  • Note on Cambozola: You may need to edit security for your Java client and add an exception for your IP address/site to avoid Java execution errors or warnings. (The Jar file is self-signed.)
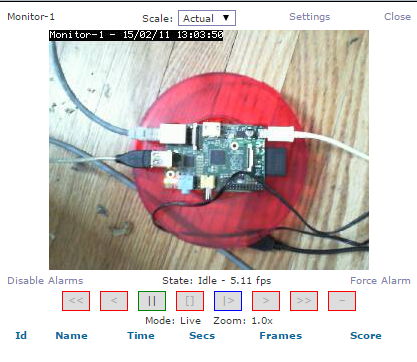
You should now have a basic working Zoneminder install on your Pi!

=-=-=-=-=-=-=-=-=-=-=-=-=-=-=-=-=-=-=-=-=-=-=-=-=-=-=-=-=-=-=-=-=-=-=-=-=-=
Notes 2/11/2015:
 This has been running for 4 days now with motion detect set/recording.  It
has caught 12 events so far. CPU load was an issue originally  and I had to
tweak FPS, kernel shhmax, and kernel shmall many times before there were no
errors found in zm logs and RPi seemed stable.  When you get yours  working
pay attention to /var/log/syslog and dmesg.  Watch for shared memory errors
and permission problems. If you find any make sure your kernel settings are
as above.

 If you find any errors in this document let me know and I will update.

 GOOD LUCK! Happy RPing
=-=-=-=-=-=-=-=-=-=-=-=-=-=-=-=-=-=-=-=-=-=-=-=-=-=-=-=-=-=-=-=-=-=-=-=-=-=

References:
http://www.zoneminder.com/wiki/index.php/FAQ (Specifically Kernel memory use)
http://paul-ik.blogspot.com/2012/09/starting-with-zoneminder.html
https://www.lisenet.com/2013/zoneminder-installation-on-debian-wheezy-with-logitech-quickcam-pro-5000/
http://rainbow.chard.org/2012/04/24/using-zoneminder-with-a-cheap-cctv-camera/